Monday, August 25, 2014

Canning Green Tomatoes for Fried Green Tomatoes Anytime

          I've done a lot of canning once upon a time, but something I never thought about was canning green tomatoes so I could have Fried Green Tomatoes anytime of the year. However, recently I came across on Facebook, Edith, my friend since we were 5 years old, and her How-to for canning green tomatoes.  It was another day that reminded me, "You're never too old to learn something."
          I asked if I could swipe her picture, and share her directions on my blog.  She said, "Yes!"
Her directions in her words are as follow:
"ok people this is how I can green tomatoes .. and yes it works....Be sure to get very green and a firm green tomatoes.... slice them and pack in qt jars... I use wide mouth because its easier to get them out....put 1 teaspoon canning salt in jar and cover with cold water. seal and put in cooker large enough to cover with 1 in. cold water. bring to a boil and then boil for 10 mins.. take out as soon as time is up.. when u r ready to cook.. Drain well and I dip them in cornmeal and fry.. I have been doing this for years and they r always good...especially when its cold outside.. But the tomatoes have to be a firm kind no juicy or they will fall apart when u go to cook them... to me they taste just like fresh ones" 

Then another friend, Sandra, commented:
"I dipped mine in buttermilk before putting them in a mixture of cornmeal & seasoned salt. They were great! I will always make sure to have some of these on hand for winter frying."

Now my challenge is to find some fresh, very green and firm tomatoes.

**********************************
Thanks to the FREE programs:
possibly used for this post
GIMP for cropping & other digital effects
 Photoscape for downsizing & watermarking photo
PicMonkey creating collages used on this page


Wednesday, August 20, 2014

Wordless Wednesday #99~ Drive Through Shenandoah Valley on a Rainy Summer Morning

All pictures are drive by shots.
July, 2014


*******************************

 Attending these Linky Parties:
 Better in Bulk studio waterstone Wordless Wednesday on Tuesday   NanaHood.com
Also:
****************
Thanks to the FREE programs:
possibly used for this post
GIMP for cropping & other digital effects
 Photoscape for downsizing & watermarking photo
PicMonkey creating collages used on this page

Monday, August 18, 2014

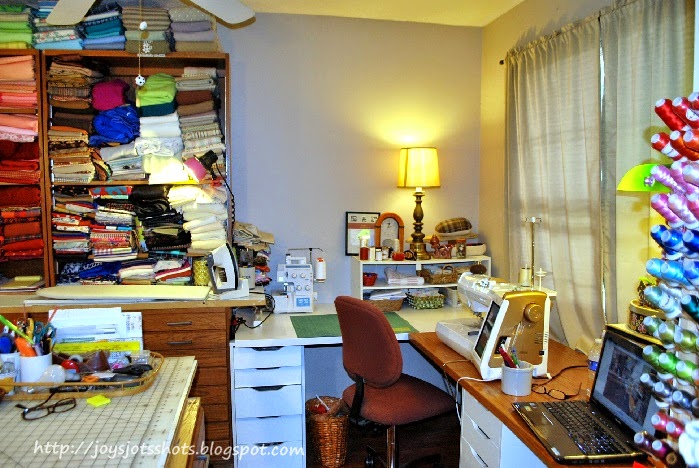
What Only 6 Inches Can do in a Sewing Room

From this
to
THIS
 Thank-you Mr. G for moving the 2 heavy cabinets and shelves over 6 inches, and putting together 2 IKEA storage units and table.
What a difference in work space it created!
The shelve with fabric and books were moved to the foyer where I could more easily reach and search. 
Moved the white shelve that originally was behind my machine.


Notice there is no table leg in the corner, so I can swivel in my chair right or left.
  I can easily set up my serger, or when the big machine is doing an embroidery job, I can move it to the right and set up the little sewing machine.
Because the white table was about 9 inches deeper, I had to move the oak top to the right.
Guess how much space I had?
Thought it was going to be exactly enough space, but Mr. G had to cut off a measly 1/4 inch!
But now it's all level surface and more space for computer.
I did regret losing my little person tutor space.
A little person could sit in this space, but the table went up about 3 inches which does make a difference.  An adult might be able to set up a machine here.
Wish I could get rid of cords, but distance of sockets won't allow.
Yes, just a few inches can change everything.
This isn't all the 6 inches changed.
See more later.
Meanwhile find former posts of sewing room here.
And oh my how things change in 4 years here.
**********************************
Thanks to the FREE programs:
possibly used for this post
GIMP for cropping & other digital effects
 Photoscape for downsizing & watermarking photo
PicMonkey creating collages used on this page

Saturday, August 16, 2014

Quilt Shot Block #25~ Stack & Slashet

        I thought this method was called "Stack & Wack," but everything I saw on I You Tube showed that method produced a kaleidoscope effect. Some called this method "Stack & Slash."  That method was used to make quilt size blocks of 10 or more inches.  I decided to make a mini 4 inch version to combine to make one 12 inch block.  So I'm calling it "Stack and Slashet."


     While in Ohio a few weeks ago, we stopped at a Saturday Flea market and I purchased a large bag of vintage cloth scraps for $1.  Some pieces weren't large, but big enough to cut a 5 ½ inch square. The yellow & green piece next to it, I've had for years since my girls were toddlers.


Stack the squares and slash somewhere.


Take the top piece of the right section & place in back.

Sew pieces together in order as they now lay.


Iron, stack and slash somewhere again.


Move top piece of right section to back.

Sew sections together as they lay.


Iron, stack, rotate 180º, and slash the upper corner somewhere.


Move top piece of upper piece to back.


Iron, stack & rotate 90º.
At this point I wished I had just slashed all pieces at the beginning instead of one at a time.  So I slashed twice somewhere. 
After moving pieces to back, sew together.

 Finished "Stack & Slashets"
 Trim to 4½ inch squares.
 Lay out to suit your fancy in 9 patch order and sew together.

**********************************
Thanks to the FREE programs:
possibly used for this post
GIMP for cropping & other digital effects
 Photoscape for downsizing & watermarking photo
PicMonkey creating collages used on this page