Thursday, March 31, 2016

Thoughtful Thinking Thursday #41 ~ Which Picture has a HIdden Animal?

 @ Ritch Grissom Memorial Wetlands
Melbourne, FL, USA


Did you find the hidden animal?
It's in 4 pictures.  
Think about it.
Another something I didn't know about,
until I looked at the pictures on my laptop.

**********************************************
  ****************************************
Thanks to the FREE program

 Photoscape for downsizing & watermarking photo & other alterations to pictures.

Wednesday, March 30, 2016

Wordless Wednesday #166 ~ Spanish Moss @ St. Simons

Good title for a song?
or am I just thinking of Gordon Lightfoot? (play that while you are wordlessly viewing these shots.)
@ St. Simons, GA, USA

 @ Ft. Frederica on St. Simons


****************

Thanks to the FREE program
 Photoscape for downsizing & watermarking photo & other touch ups.

Tuesday, March 29, 2016

Adjustable Waistband Skirt

         Here's how to make a skirt for that special little one when you don't have any measurements.


*************** 
*A Tutorial Tuesday*
      It does help if you have a vintage pattern, or in my case an old pattern that came in size 1.  When my girls were 1 year old, I remember the pattern sizes pretty much went with their age.
        The waist measurements on the chart on the back can help.
         However, to cut my rectangle pieces I used measurements from this gathered skirt pattern piece which included an elastic waistband allowance.  You can see here the rectangle measurements including seam and  for a size 1 skirt was approximately 11 inches tall and 14x2= 28 inches wide.
           For the ties, I wanted to be able to tie a bow, so I almost doubled the length and just cut a 1 inch strip across a 45 width piece of scrap fabric.  I did not cut on the bias because I didn't want stretch.


        The half inch wide ties seem to large for a little 1 year old, so I folded it in half and topped stitched the edge to make a quarter in wide tie.
        A 3/4 inch wide elastic was used for the waste band.  The top of skirt pieces were turned and pressed accordingly allowing for stitching without catching the elastic.
          One tie was cut in half and stitched to about 5 inches of elastic.  The 3 inch piece did give enough extra stretch.
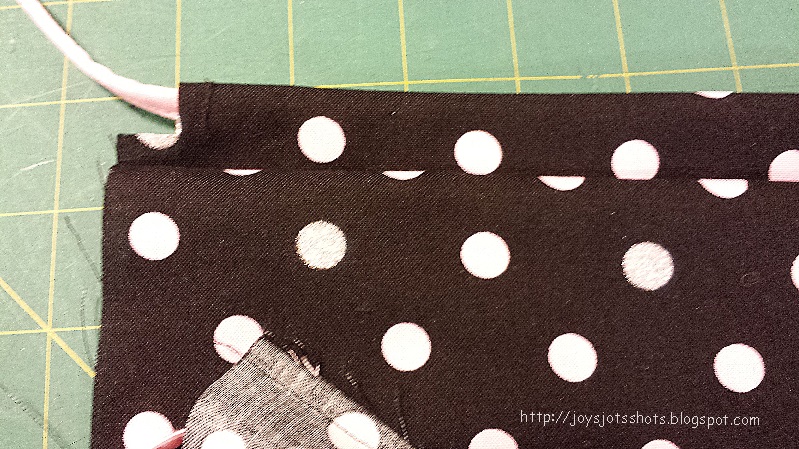
              At the top of each corner of each piece, cut in 1/2 inch about 1 inch in.  This is allowing an opening for the ties.
            Double turn 1/4 inch then 1/4 inch again, and top stitch along the edge.


          The ties were aligned to the middle of each skirt piece and tacked down.  I didn't want them sliding out.  You might want to skip this step?
           I like to turn and pin over the tie so I don't have to thread the tie through later.  Remember, it's already been pressed so you know where to turn.
              Then turn back again using the raw edge as a guide.  You might get a better view of this method at this old post.
   You will be stitching along the folded/raw edge.
Before I stitched, I checked where the elastic edge was under the folded and found I had a 1/4 inch seam allowance which is what I was expecting.  You may not need to mark a guideline like I did.
Be sure to keep the ties away from the stitching line.
You can machine stitch and zig-zag or use the serger.
I love the ready made look this technique gives this waistband.
 Stitch side seams.

          My ties were way too long so I cut to fit and tied a knot in each end. Pulled to about 19 inches like the pattern measurements suggested. I thought about adding a pink ruffle at the hem, but I ended up just turning the serged edge and top stitching.
The leftover ties were used to make more bows.
*********************
Next week: The tank top that goes with this skirt.

****************
Thanks to the FREE programs:
possibly used for this post
GIMP for cropping & other digital effects
 Photoscape for downsizing & watermarking photo
PicMonkey creating collages used on this page


Monday, March 28, 2016

Memory Monday 1 ~ Hospice Hobbies Too: Jigsaw Puzzles

The following is a post I made back in 2014 during the last days of losing my Mother. As you know, things get a bit hectic afterwards, & then a few days of rest. Therefore, this piece never got posted. 
Thought it would be a good way to start off Memory Mondays.
Miss you Mother.
*******************************
     We've put together several jigsaw puzzles.  After about 3 puzzles, I decided to start taking pictures to see how many we put together. They are habit forming. This is one we found at the Hospice house.  Had one piece missing & one that didn't belong.  I have bought several more puzzles at second hand stores ranging from $1.50 to .75$.  Mr. G bought one that was supposed to glow in the dark.  We didn't get a picture of it, and didn't find out if it glowed.  Just have to put it together again later. Not complaining.
5th puzzle.
We've put puzzles together with Mother at her house over the past few winters.
Back then, Mr. G didn't want to have anything to do with puzzles.
Now, we've got him hooked too!

Finally!  Put a puzzle together that has ALL the pieces.

****************
Thanks to the FREE programs:
possibly used for this post
GIMP for cropping & other digital effects
 Photoscape for downsizing & watermarking photo
PicMonkey creating collages used on this page

Sunday, March 27, 2016

Sun Best ~ Wood Stork - Love His Hair Cut

 @ Ritch Grissom Memorial Wetlands
Melbourne, Fl, USA
**********************************************
  ****************************************
Thanks to the FREE program

 Photoscape for downsizing & watermarking photo & other alterations to pictures.

Saturday, March 26, 2016

Quilt Shot Block #62 ~ 4 Corners 4 Patch

4 Corners 4 Patch
by "Love of Quilting"
12 inch block
 Back in December, I was looking through the latest "Love of Quilting" magazine, 
and found this super simple quilt block.

Thought it would make a perfect memory quilt from Mother & Dad's clothes 
since I like to cut them in strips.

So I tried it out today.  Quickly sketched out the measurements 
 for a 12½ inch block.
Sewed a 2½ inch strip to a 4½ inch strip.

Cut apart into 6½ inch squares
How easy is that?
THE fastest quilt block I've made for this post.
So, the memory quilt should go together fast!
Oh, by the way, I just made this from scraps and happened to have just enough of the bird strip.
When I got done, I thought it sort of looked like a block for Easter!
So, Happy Easter!  Thank-you Jesus.
 While one block may not look spectacular by itself,
the combined effect is great.
***********************************************
Find out how to tile your blocks to see their effect by
following my tutorial  (the software is free).

How to Use PhotoScape to Test a Quilt Block Design

**************
If you didn't get the magazine, you can see this done
on the following YOU Tube


**********************************************
  ****************************************
Thanks to the FREE program

 Photoscape for downsizing & watermarking photo & other alterations to pictures.